Well-Breaded
My writing today and the bread recipe at the end are full of gluten. I’m not sure whether clever cooks and bakers out there can adapt the recipe to make it gluten-free, but let me know if you can and if it rises to the occasion.
My mother made and baked an old-fashioned white bread. It was my favorite after school snack. This bread was not dairy or sugar-free either because I’d slather butter on it, and sometimes sprinkle a bit of brown sugar on it too. Each bite had that elastic spongy texture of good yeast breads. Since dinner was served later, the bread didn’t spoil my appetite. This bread was not the bread of sandwiches, that fortified and preserved bread cut in thin slices that held chicken salad or tomato slices with cheese. Sandwich bread could hold those fillings and needed them to make the bread taste good. The point was to hold the fillings in place and make it convenient to eat delicious and messy fillings. Bread like Mom’s could fulfill the sandwich role, but why use it when it was meant to be a meal one could chew on slowly, savoring each bite?
Since many of us are too busy or impatient to wait for good homemade bread, I think there should be bakeries that sell that type of bread in every town and on almost all street corners in cities. In France people can be seen with their baguette in hand or in their bicycle baskets. We didn’t need to walk far to find one of these bakeries when we were visitors there. But we are not in Paris.
I was delighted when the breadmaking machine was invented. How convenient for those of us who love the aroma and taste of fresh bread. I have several bread machine recipe books and have tried many recipes including those calling for dough (just the first rising) which I use for pizza crusts and rolls. I am on my third breadmaking machine. Unlike Mom, I usually use a combination of whole grain and bread flours. If you use all whole grain, you will likely be pumping up your dough with some additional gluten. Although I have no plans to give up my bread maker, recently, I’ve not been completely satisfied with the bread from the machine. First, the bread seems best when it doesn’t have whole wheat or too many other whole grains that don’t weigh down the bread.
Perhaps bread is best when it is mixed and kneaded by hand. I catch myself looking in the little window at the dough mixing and want to mix it myself. I peek too often to see if it’s rising the way it should. Of course, the machine is controlling all of this mixing and rising. Sometimes the bread is a surprise too–too hard, too flat on top, too gummy, and stale in a short time. After it cools, it’s toast, which is okay too. I never waste it. I make croutons, crusties,,or stratas. I freeze it for toast and paninis. Yes, I can provide recipes. I will keep using the machine but I also began making artisanal breads—the kind we need but don’t need to knead.
I began artisan bread using half whole wheat and half bread flour and still felt something was missing. Finally, I realized that with both the machine and the artisanal bread, my problem was the whole wheat. It made my bread taste a little like sawdust and bitter. I looked on-line and found that others had experienced this too. Maybe you have too. If you know of a whole wheat that tastes good and is not bitter, let me know though I know you bread eaters are a scarce breed.
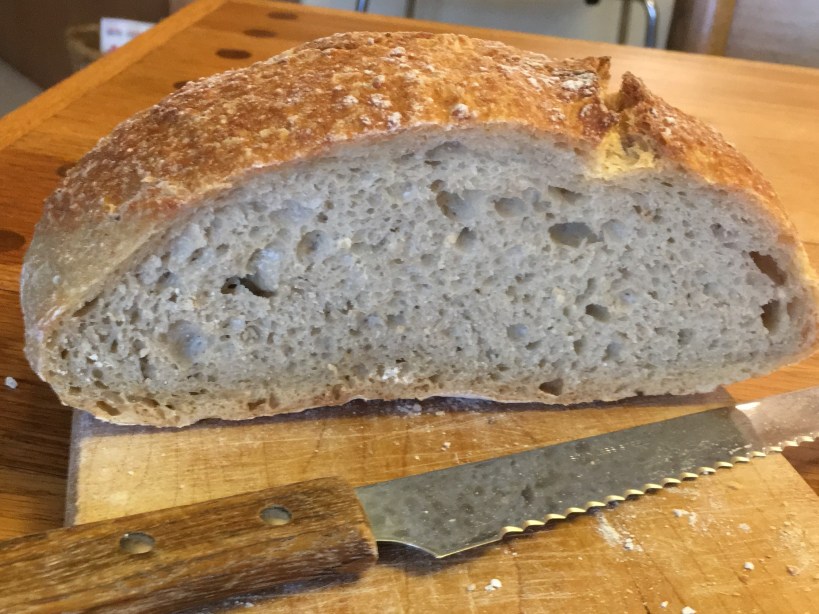
But with some experimentation I have a recipe which I love without whole wheat. It is 1/3 whole grain. Variations of this bread can likely be found in bread machine recipes too.
Regardless of how I make bread, machine or not, I don’t control the process. Do I breathe on the dough and make it rise? Do I make the wheat grow in the soil? For that matter, do I send the rain, cause the sun to shine on the plants? The beauty of bread is another reason to give thanks and say a prayer before biting into it.
My Artisanal Oat Bread
2 cups bread flour
1 cup oatmeal flour –Note: I grind up regular oatmeal (but quick should work too) in the food processor or small chopper until it’s flour. Of course, the flour is also available already ground in grocery stores.
¼ tsp. active dry yeast. I used Fleischmann’s for this recipe but Red Star active dry yeast works too.
1 tsp. salt, or kosher salt. Use more if you like your bread saltier.
A tsp. of sugar or honey
1½ cups plus 2 tablespoons room temperature water
1.In a large mixing bowl, combine flours, yeast, and salt. Stir in the water. When it’s incorporated, cover the bowl with plastic wrap or a shower cap, and let the dough rest at room temperature for 12 hours. It can rest for longer, just so it has doubled in size and is covered in small bubbles.
- Cut a square of parchment paper and sprinkle it with flour. Place the dough on the flour and fold it lightly over on itself. Coat it with a bit of flour to keep it from sticking to the surface and your hands. Shape the dough into a ball, tucking any seams underneath. Place the dough seam side down on the floured parchment and place the dough on the parchment back into the mixing bowl, cover the bowl again with plastic wrap and let it rise for 2 hours until the dough has doubled in size.
- Preheat the oven to 450 degrees and place a cast iron Dutch oven or stew pot in the oven to preheat. Transfer the dough on the paper into the Dutch oven and cover with the lid. Bake the loaf for 30 minutes. Then uncover the pan and bake the loaf until it is well browned and sounds hollow when tapped, about 20 minutes more. Cool on rack before slicing. Makes a 24 ounce loaf.